
The Problem
A couple of days back, one of our clients came to us asking for help with their website. He was panicking because every time that he tried to go to his website, it would redirect to multiple different websites and in the end, it would stop in something like the image below.

The first thing that I did was to run a website security check & malware scanner using https://sitecheck.sucuri.net/. The tool identified a security breach and a lot of malware on the website. The scripts that it found were:
All the scripts mentioned above were injected all over the website. At that point I did not know why this happened, so I dug a little more.
All the scripts mentioned above were injected all over the website. At that point I did not know why this happened, so I dug a little more.
The Research
Doing some research, I found some websites that would provide some clarification around why this happened and the steps to fix this problem. Some websites that I found were:
- https://dorset.tech/nasty-new-malware-doing-the-rounds-lowerbeforwarden-ml/
- https://okeyravi.com/wordpress-website-malware-fix/
- https://txnkaro.com/blog/how-to-clean-js-donatelloflowfirstly-ga-virus-from-wordpress-site/
To provide a summary of my findings:
- This virus started to attack around the last week in August 2020. Its main targets were WordPress sites.
- The reason why the website got attacked was that the plugins were not up to date. One of the plugins installed (wp file manager) had a vulnerability that was used by the malware to get in.
- The code was injected in the database as well as in the wp files. To fix it, you need to remove it from both places.
The Solution
So, after doing all my investigation and knowing what to do I proceeded to fix the website of my client. Before doing anything, I made a recipe on my computer of the things that I would need to fix the website and what would be the end result(and that’s how I’m going to put it for you down below).
Ingredients
- Access to my client’s CPanel
- A code editor (I used VScode)
- A zip software (Windows has a native one but I like to use 7zip that gives me more options)
Steps
- Clean Database
- Clean Files
- Disable Plugins
- Install Antivirus Plugin
- Enable Plugins
- Validate Website Is Back On-Line
1. Clean Database
Before doing anything, I made a backup of the database and the entire folder in case something went wrong.
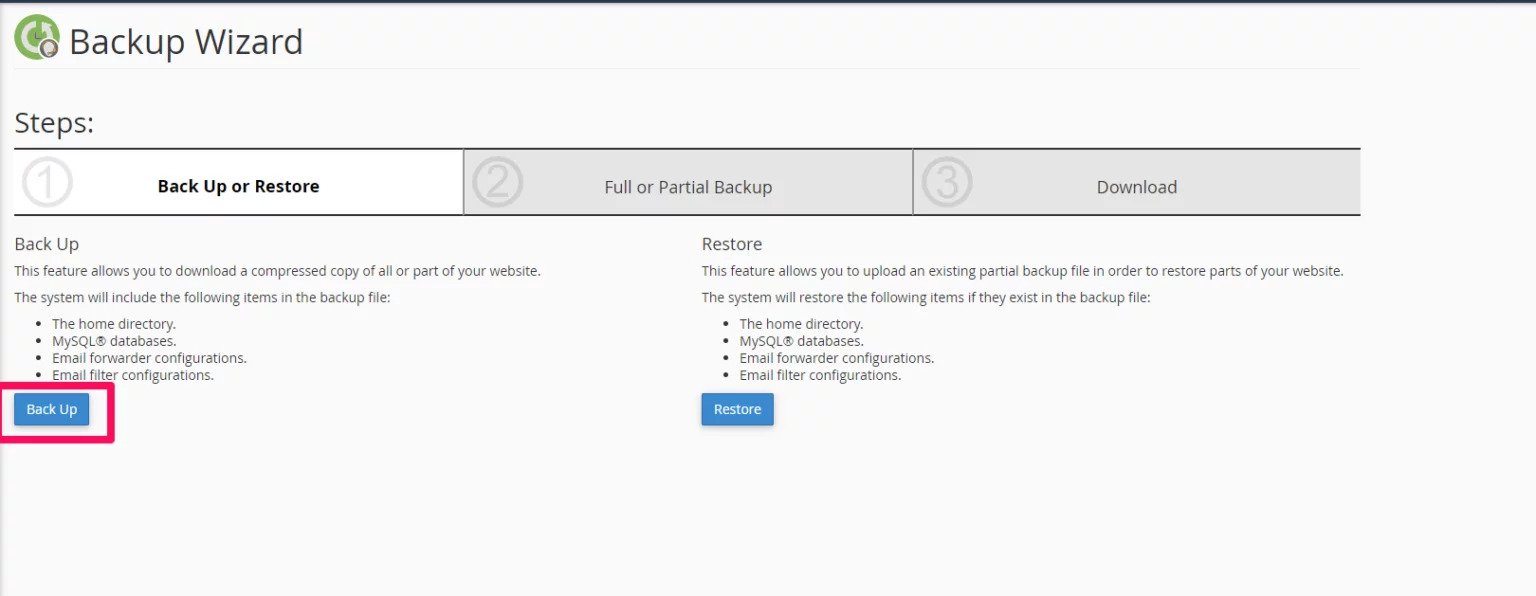
- Went to the CPanel and clicked on Backup Wizard in the files section.
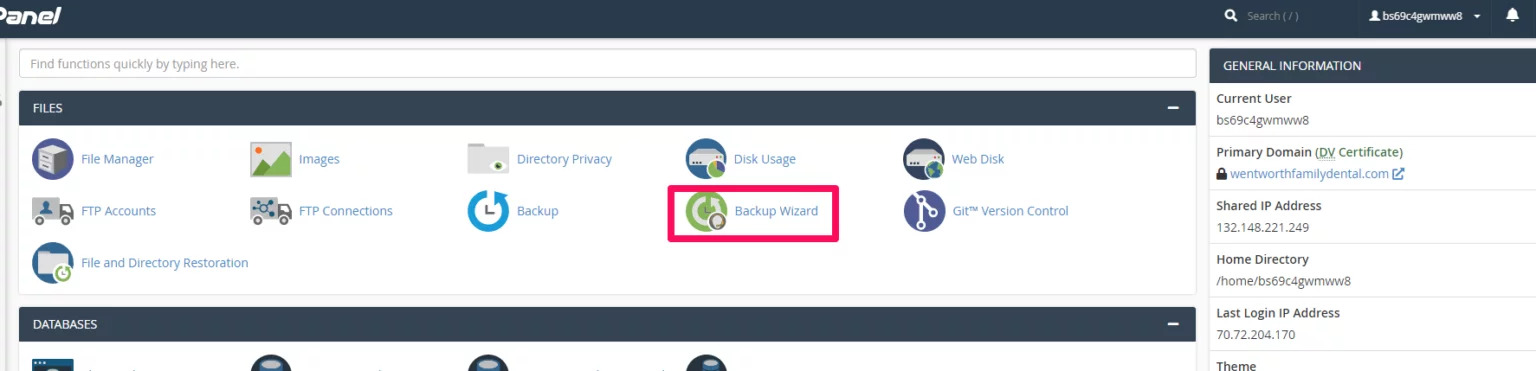
- After clicking on Backup Wizard, I clicked on backup and then on full backup.
- After doing the backup, I went and click on phpMyAdmin to go and remove the malware from the website. In phpMyAdmin, I selected the database of the website and went to wp_posts and executed the command below.
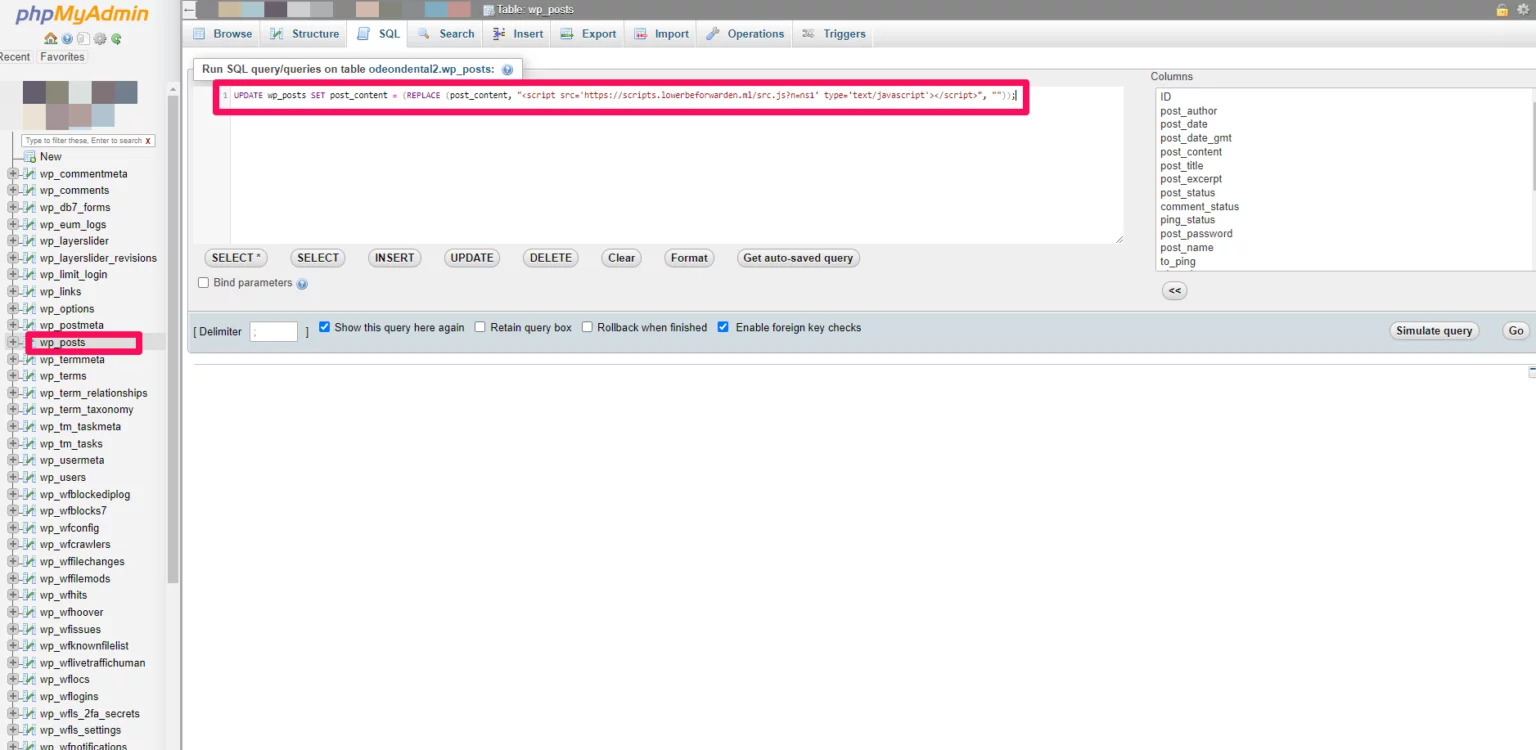
- One thing that I like to do when I’m running commands in SQL is to click Simulate query before running it, so I know how many records are going to be affected and make sure that I’m not messing anything up.
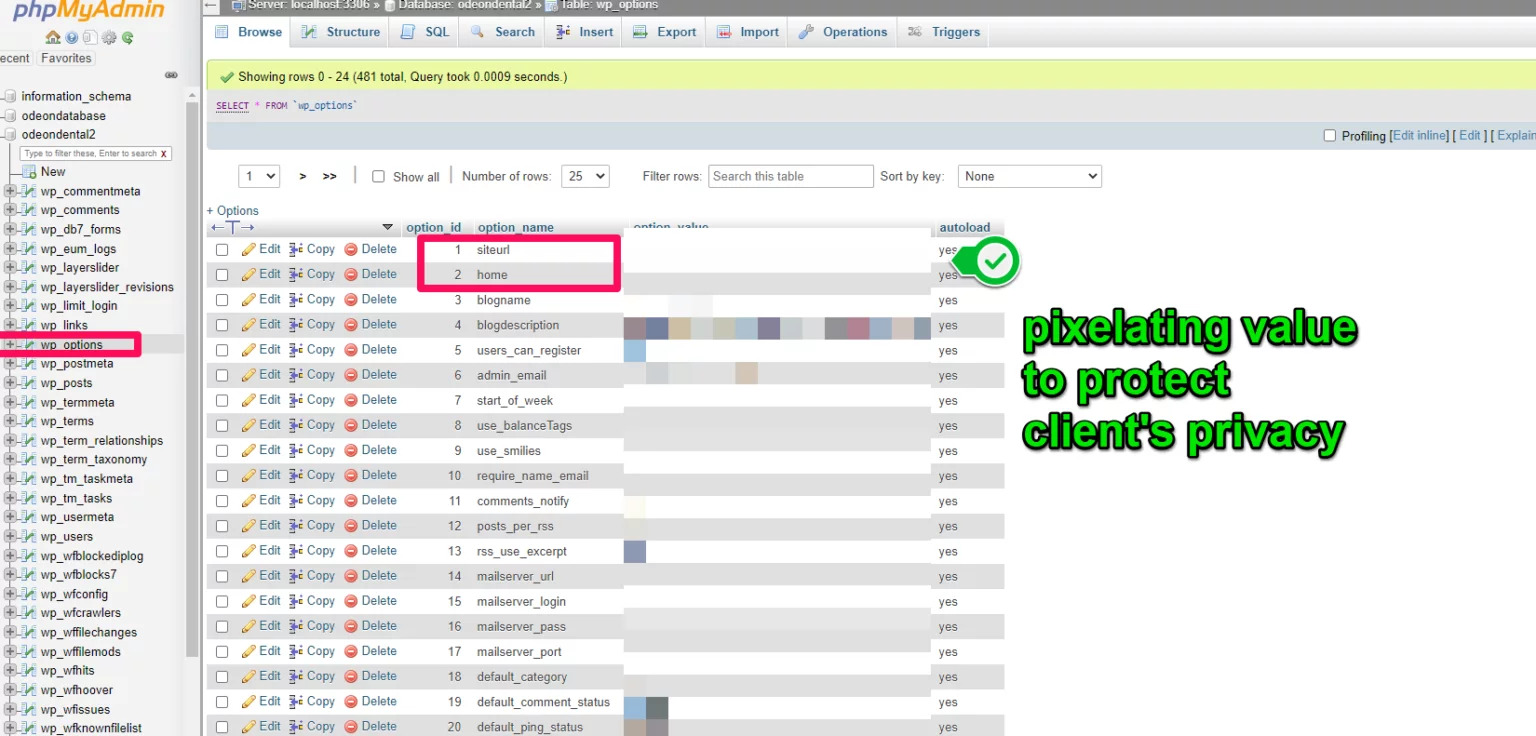
- Another thing that I checked was the siteurl and home option_value in wp_options to make sure that it was the correct domain of the website.
After performing the steps mentioned above, the database was cleaned of any virus and malware injected.
2. Clean Files
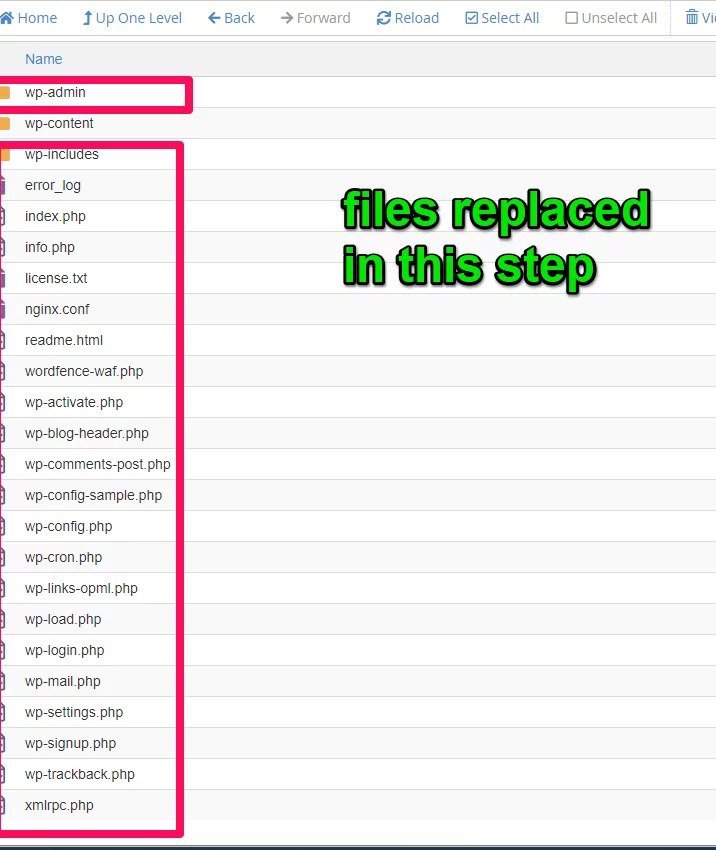
This was the tedious part of this whole process. To clean the files, because there were so many of them infected, I had to download them to my computer, do a find and replace and push them back to the server. However, reading one of the links that I mentioned above, I only had to do this for the wp-content folder because for the rest of the files and folders in root what I did was to push the newest version of WordPress that you can find here (NOTE: the folder downloaded from this website has a wp-content. If you don’t want to accidentally delete the content of your wp-content make sure to remove it before putting it on the server). So, the steps were:
- Downloaded the latest WordPress release. Unzipped the folder. Removed wp-content. Zipped it. Pushed it to the server and replaced current files (this only replaced wp-admin, wp-includes, and files in the root folder).
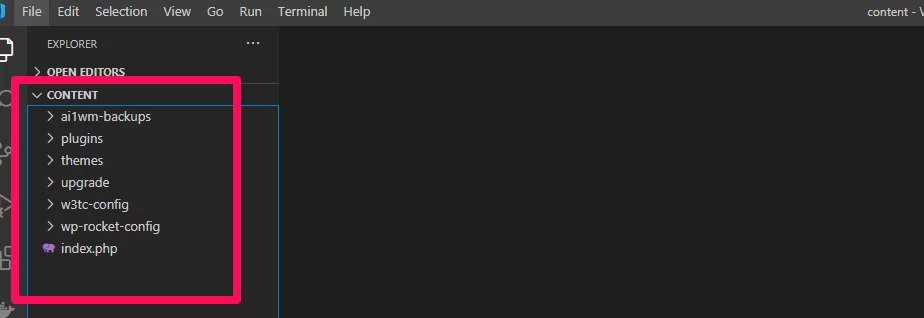
- Zipped wp-content in the server. Downloaded the file to my computer. Unzipped the folder and opened it with VSCode.
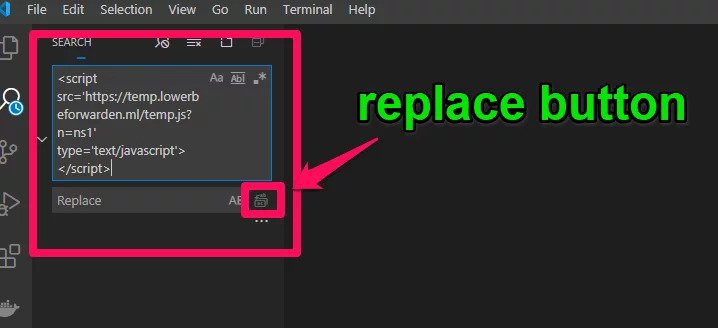
- After opening the folder in VSCode, I performed a search of the following strings and I replaced with blank (see the image below).
- After replacing all the malware in the wp-content, I zipped the folder and push it back to the server. After pushing the new folder into the server, I unzipped it and replaced the current folders with the fixed ones.
After doing all this, my files were clean and malware-free. One thing to mention is that if you check your website on sitecheck again, the online tool will say that your website is still infected. This is because these online tools they cache the information and do not check the website until some time has passed. The best way to test if the malware was removed is to see if you can log into the WordPress backend. Before doing this, make sure to disable all plugins.
3. Disable Plugins
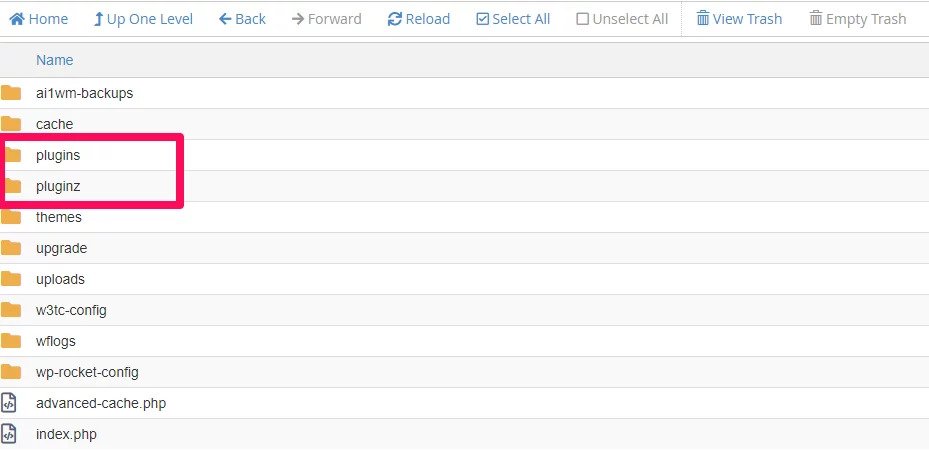
Another thing that the website that I found on google recommended was to disable all plugins. This is something that people always do when their site has problems loading. What they would do is, go to the wp-content folder, rename the current plugins folder with something else (e.g. pluginz) and create a new empty folder called plugins. Most of the time this will help you get back to the backend of your WordPress site.
4. Install Antivirus Plugin
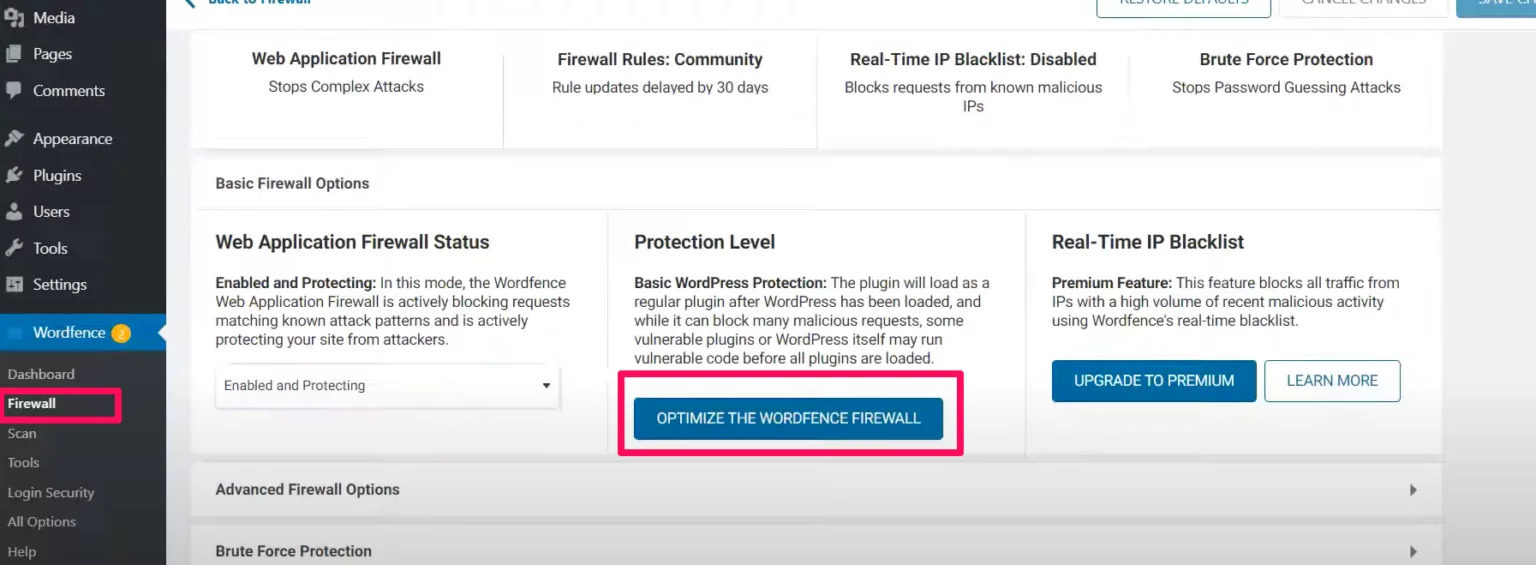
After being able to go inside the backend of the WordPress website, the first thing that I did was to go to the plugin section and install Wordfence. This plugin is recommended by a lot of websites to prevent your website from being hacked. So, I did the following:
- Installed and activated Wordfence plugin.
- Went to the firewall section and clicked on optimize the Wordfence firewall.
- When to the scan section and changed the scan type from standard to high sensitivity.
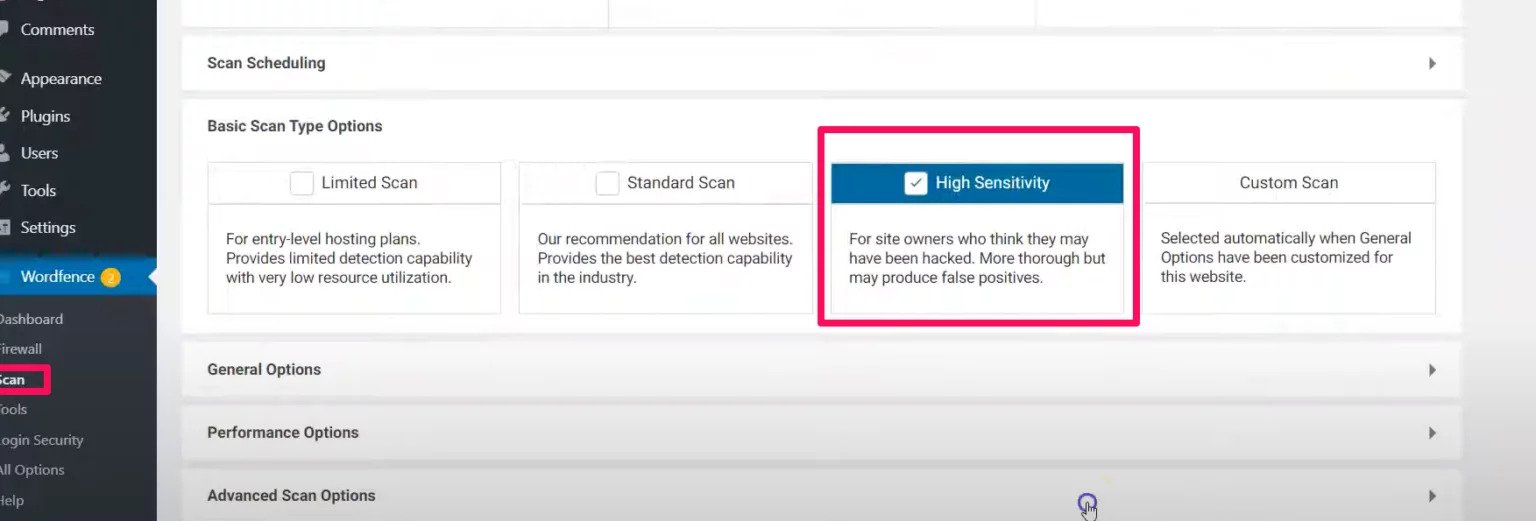
- Started a new scan and repaired all the repairable files.

This tool might show you some outliers when running the scan saying that the files that you fixed still be infected. You can randomly take one or two of the files detected by the tool and validate it manually by going to the file and check that the malware is not there anymore. This also happens because of the cached information in the server.
5. Enable Plugins
At this point, my website was still not showing because the plugins required for the website to work were not installed (that is because I renamed the folder from pluginz to plugins). The steps to solve this were:
- Move the plugins from the pluginz folder to the plugins folder that I manually created. In the plugins folder, you should only have a subfolder called Wordfence (the plugin that we installed above).
- The next thing was to delete wp file manager from the plugins folder because it was not necessary, and it was the plugin that caused the breach in the first place.
- After moving all the plugins, I went to the plugins section on the backend and activated and updated all the plugins.
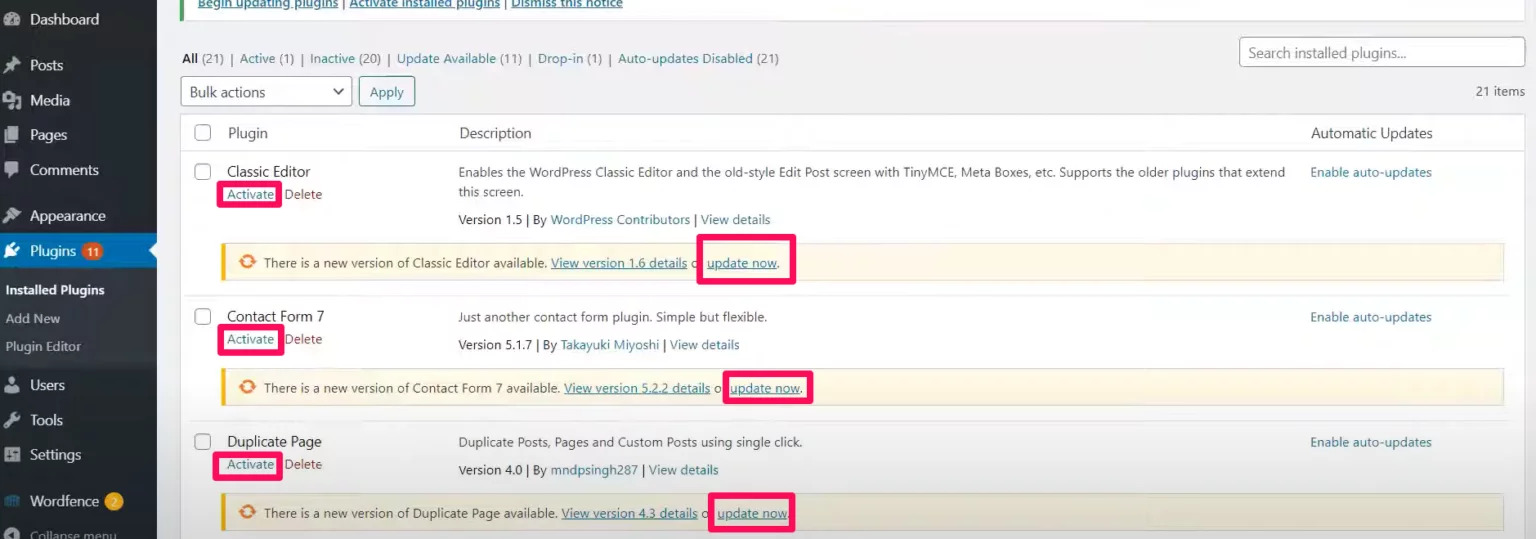
Another thing that I did was to enable auto-updates for all the plugins installed. I like this new cool feature of WordPress to maintain the plugins up to date. Some people don’t like this option because if the newer version is not compatible with your WordPress version or with other plugins, your website will experience some problems. However, I prefer going to the backed and downgrading the plugin version than doing this whole process again.
6. Validate Website Is Back On-Line
After performing all the steps above, the last thing was to check that the website was back on-line and make sure that everything was working properly. One good thing to do after you have recovered your website is to change the credentials of your website.
The Summary
So for the TLDR(Too Long, Didn’t Read) people, I’m going to summarize all the things that I mentioned above.
- New malware is infecting WordPress websites by attacking vulnerabilities in plugins that are outdated. Make sure your plugins are up to date.
- The virus injects code into the database and files. To fix it you need to remove it from both places (I explain how to do it above).
- You might need to disable plugins to get to the back inside your website. After you have successfully gained control of your website again, make sure to install a plugin that protects you from these viruses. After doing that, remember to enable the plugins again
- If you want, enable the auto-updates for all your plugins. Remember that this might make your site break because of incompatibility issues with WordPress or other plugins.
- Change your credentials after you have successfully recovered your website
If you need help with this kind of issue or any issue that you might be experiencing with your website, do not hesitate to call us. We will be happy to help you!
